Create a Function
Table of contents
- Introduction
- Creating a custom app definition
- Creating the mock.shop custom app
- Running and installing the app
- Creating and uploading the Function
- Conclusion
Introduction
In this step-by-step guide, you will learn how to integrate the mock.shop API into your editorial and delivery workflows using Functions and Contentful's Framework. Functions are powerful tools that operate on Contentful's infrastructure and enable the integration of external content into your Content graph.
Creating a custom app definition
Functions are part of Contentful's Apps. We first need to set up a custom app. To set up a custom app:
- Log in to the Contentful web app.
- In the top-left corner, click the organization name and select Organization settings & subscriptions.
- Go to the "Apps" tab and select Create app.
- Select "Create app".
- Configure the app settings as follows:
- Change the app name to "Mock Shop Tutorial".
- Deactivate the Hosted by Contentful option as we want to serve the app locally first.
- Set the URL where the app will be hosted for now to "http://localhost:3000".

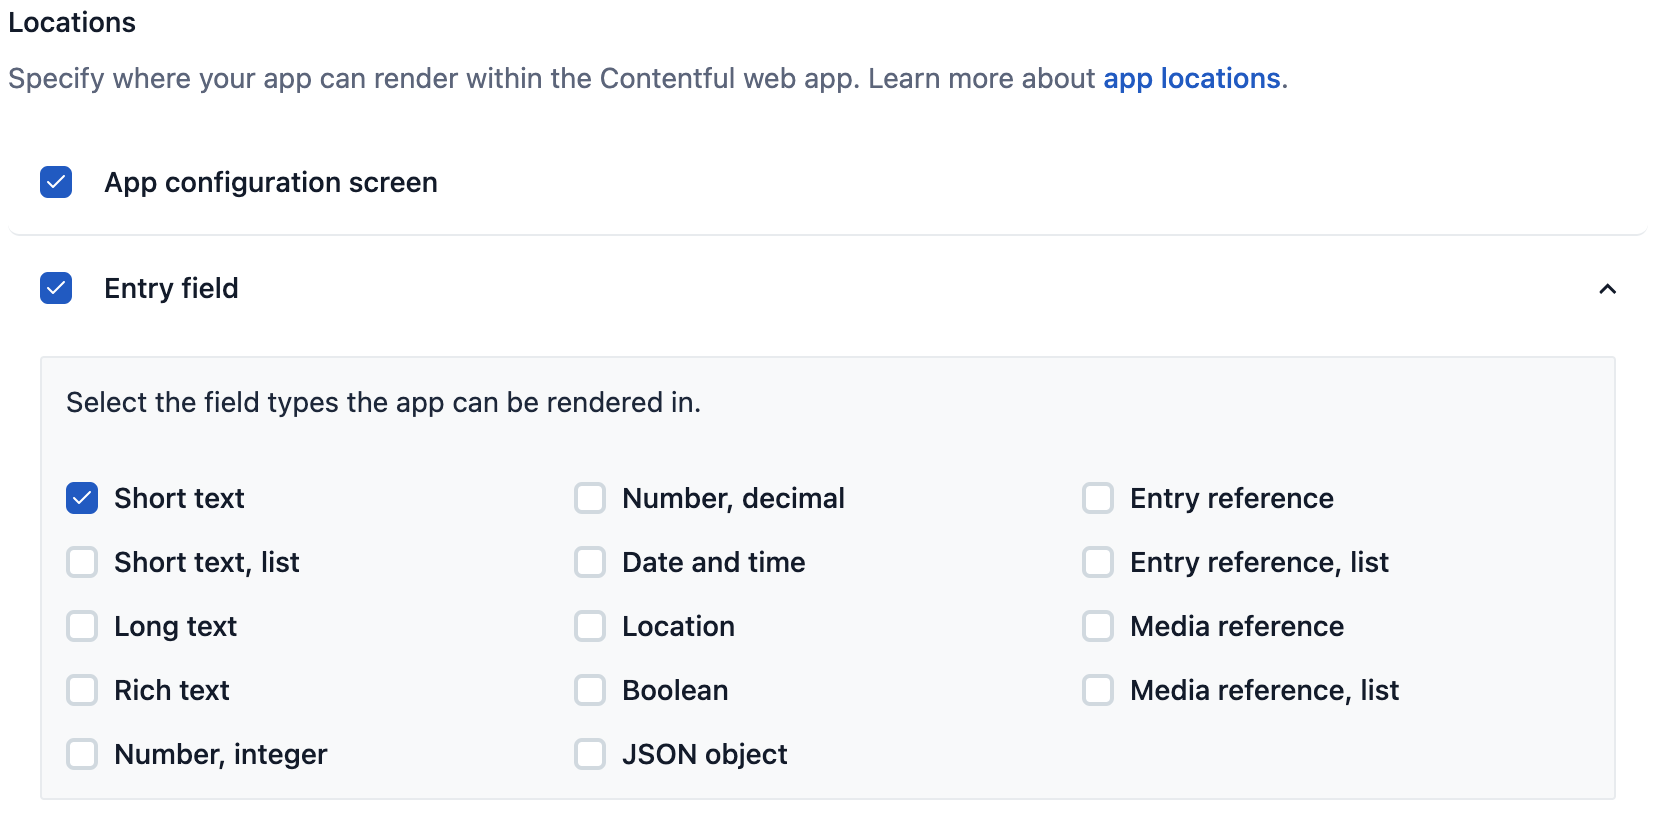
- Select the App configuration screen option as we want to provide some basic app configuration.
- The Function uses the ID of the product to fetch the product information. This ID is stored in a text field of an entry and passed into the Function on execution. To be able to select products from the product picker, instead of typing them, select the Entry field check box and set the field type to Short text. This allows us to change the appearance of the text field later to a product picker defined within this tutorial.
Making the Function and app configurable
We should provide some configuration for the Function and the app. This can be:
- access tokens
- API endpoints
- any other configuration your app or Function might depend on.
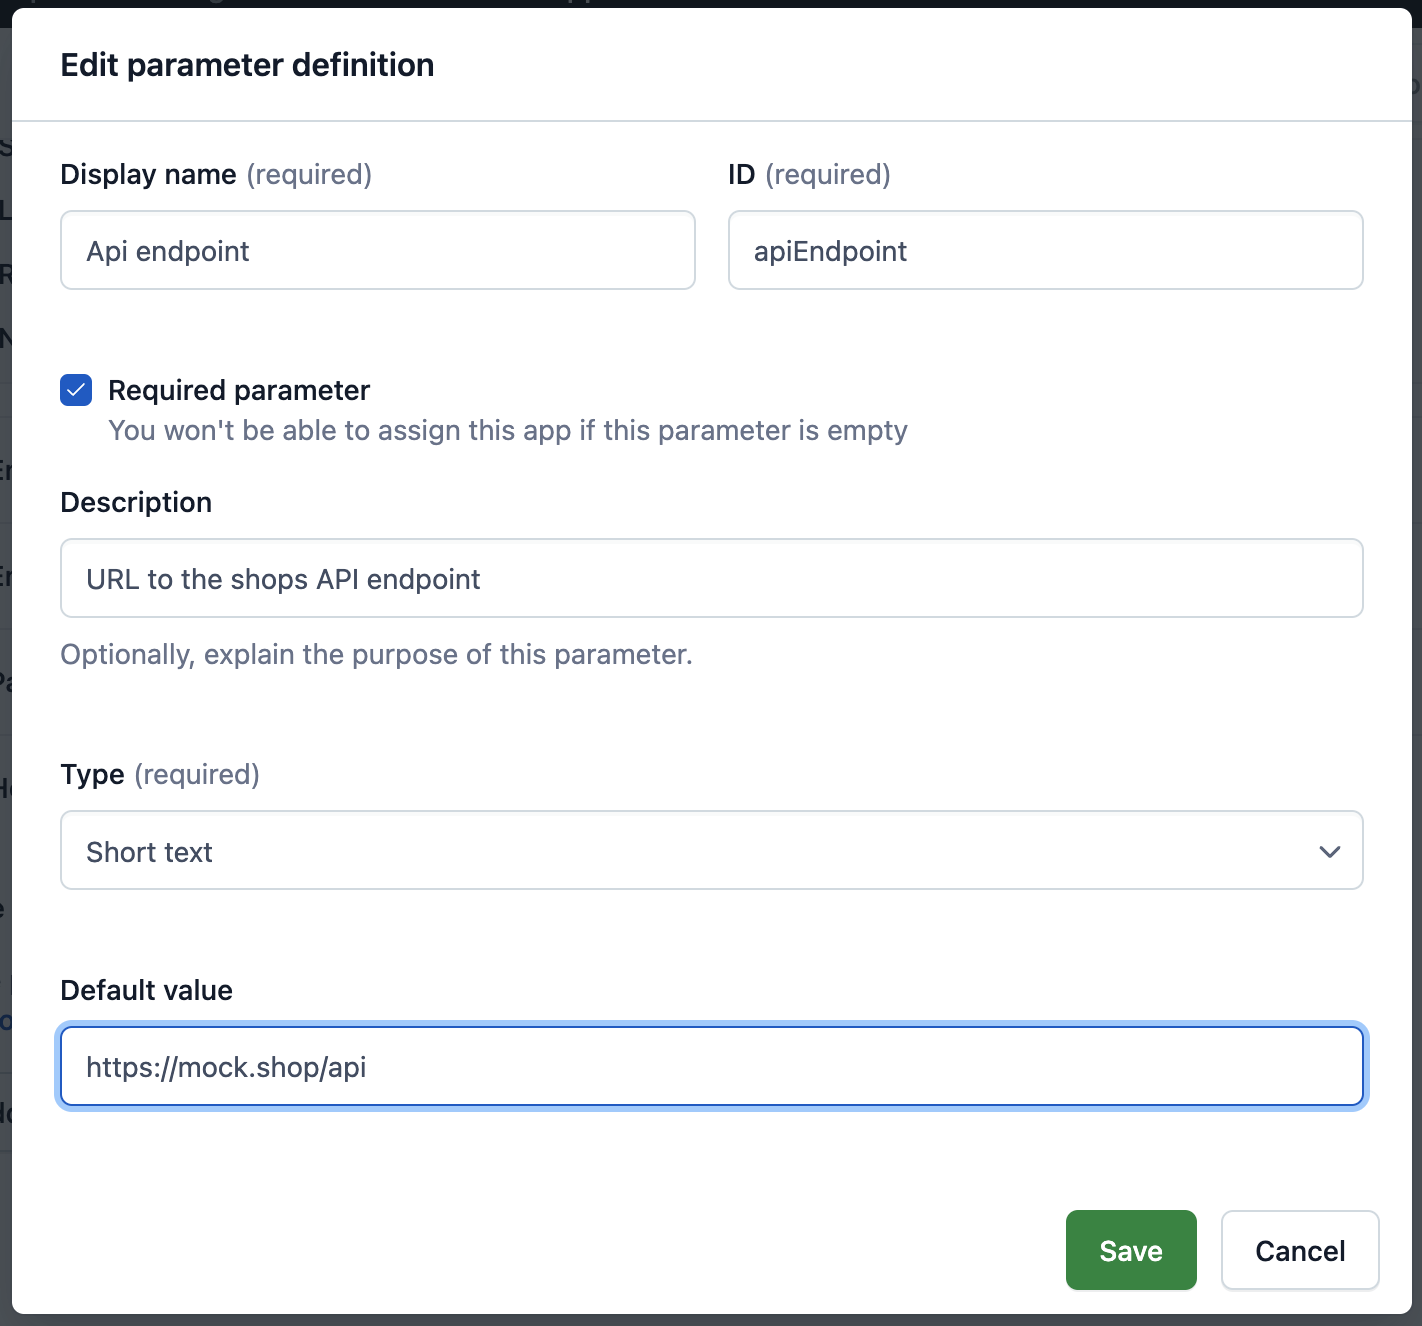
The configuration is accessible through the context passed to the Function during execution. The configurations are persisted as instance parameters. Under "Instance parameter definitions" you can define fields that store parameters for each app installation. In this example, we will make the mock.shop API endpoint configurable within the Function and app. To make the mock.shop API endpoint configurable:
- Click Add instance parameter definition.
- Set the Display name field to Api endpoint (the ID is automatically generated).
- Select the Required parameter check box.
- Set the Type field to Short text and define the Default value field as "https://mock.shop/api."
- Click Save to store the parameter.
Creating the mock.shop custom app
The next step is to implement the app responsible for rendering the product in the entry editor. Open any terminal and run the following command:
$ npx @contentful/create-contentful-app@latest \
    -e function-mock-shop
This generates the entire code needed for the app and Function. We get the following directory structure:
.
├── functions
├── public
└── src
    ├── components
    ├── hooks
    └── locations
The following is a breakdown of the code:
The code for the Function is located in the functions directory.
The src folder contains all the code to render the product picker into the Contentful web app. The entry point of the app is the <App /> component in .src/App.tsx. It is responsible for rendering the correct component into the web app's predefined locations as defined in ComponentLocationSettings.
const ComponentLocationSettings = {
  [locations.LOCATION_APP_CONFIG]: ConfigScreen,
  [locations.LOCATION_ENTRY_FIELD]: Field,
  [locations.LOCATION_DIALOG]: Dialog,
};
Next we have all the location components in ./src/locations:
ConfigScreen: Renders the configuration screen to set up the shops API endpoint.Field: Renders the product picker where we later can select a product.Dialog: Renders a dialog containing all the products which can be selected.
The ./src/hooks directory contains hooks to fetch products for the product picker.
Finally, the ./src/components directory holds basic view components to render the products.
If you want to learn more about custom apps, refer to the following resources:
Running and installing the app
Now that all the code from the example template for the app is in place, we have to run and install the app. To run the app locally, execute:
$ npm install # if packages are not already installed
$ npm run start # will start the local development server
Next, install the app. To install the app:
Go to your space and click Apps in the top menu bar.
Select Custom Apps. The list of custom apps available in your space is displayed.
Click the three dotted icon next to your app (which we set up earlier in the tutorial), and select Install.
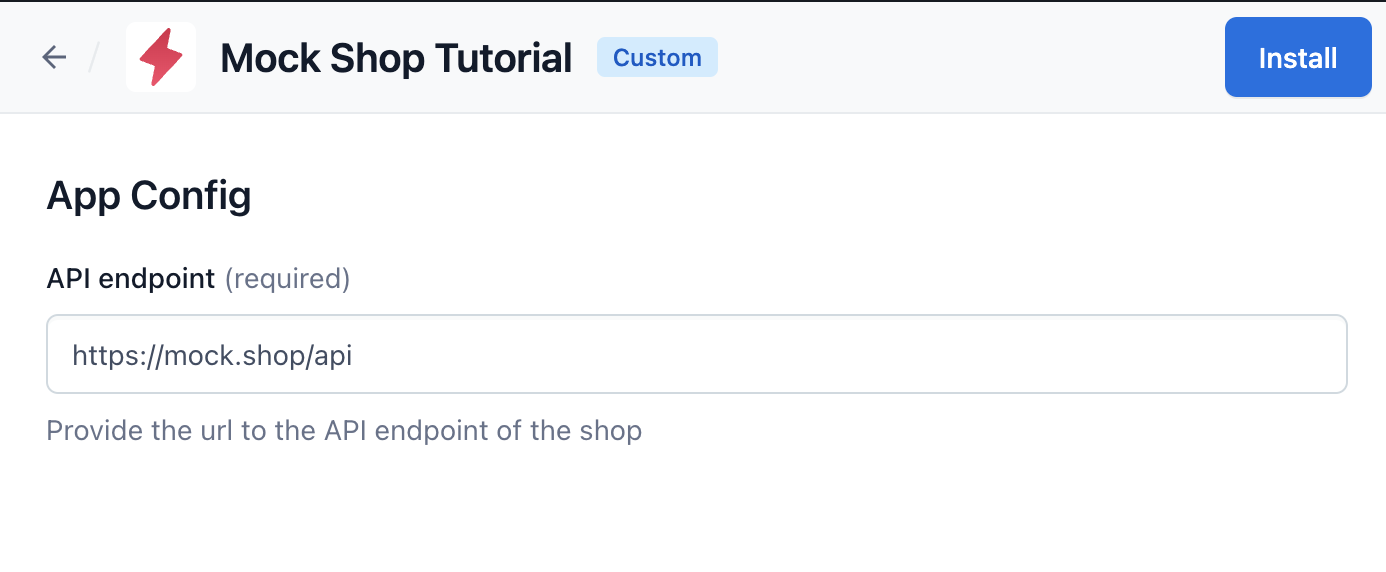
NOTE: You have to grant access to your space the app will be installed in.After granting access, the configuration screen, which is rendered by the
<ConfigScreen />component, is displayed. Put in thehttps://mock.shop/apias the API endpoint where we want to resolve products from.Click Save.
Your app is now installed and configured. Next, we are setting up the product picker for a field of a content type.
Creating a new content type
To display the product picker:
- Go to the "Content model" tab, and select +Create content type. The Create new content type window is displayed.
- Set the Name field to Product.
- Click Create. The content type is created.
- Click +Add field and select Text. The Add field window is displayed.
- Name the field Product Id.
- Click Add and configure. The field configuration window is displayed.
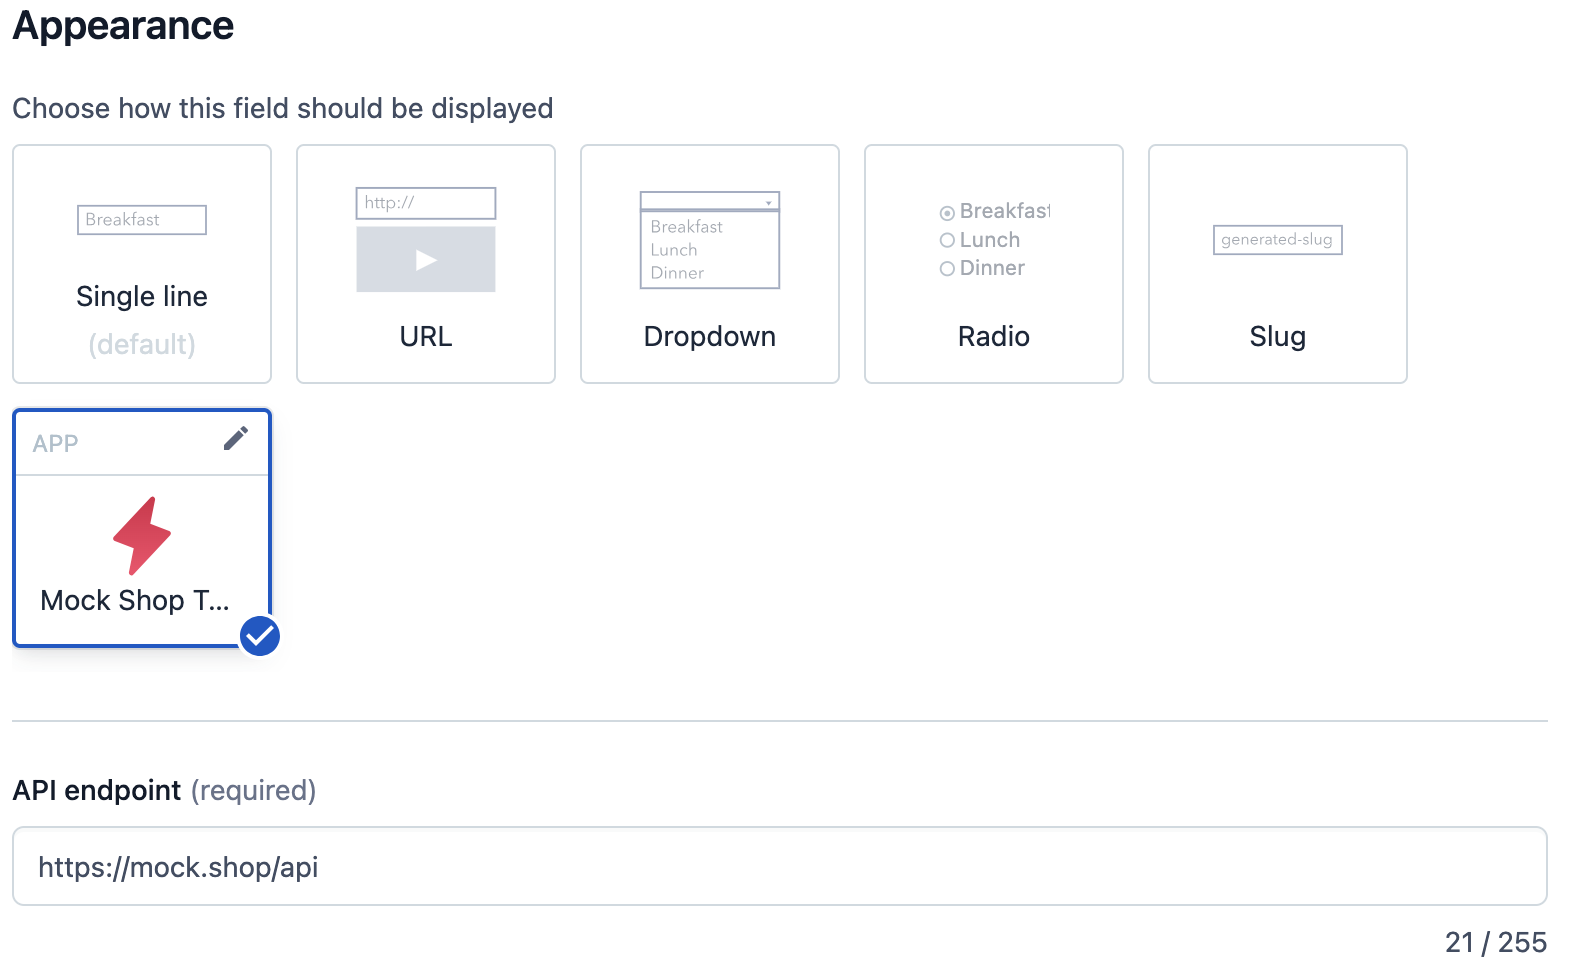
- Under the "Appearance" section, choose to display the field with the "Mock Shop Tutorial" app.
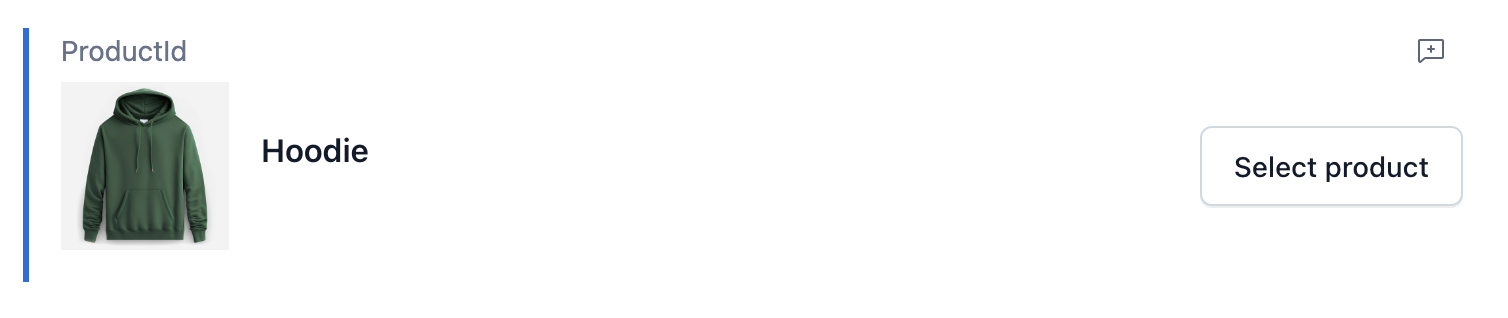
- Click Confirm. Now, when we create a new
Productentry, the product picker rendered by the<Field />component is displayed, instead of a plain text field.
Creating a new entry
Add a new entry with our previously created Content Type Product. Instead of a plain text field we get a product picker rendered by our app. Let's select a product and publish the entry.
 To select a product and publish the entry:
- Click Select Product to open the product selection.
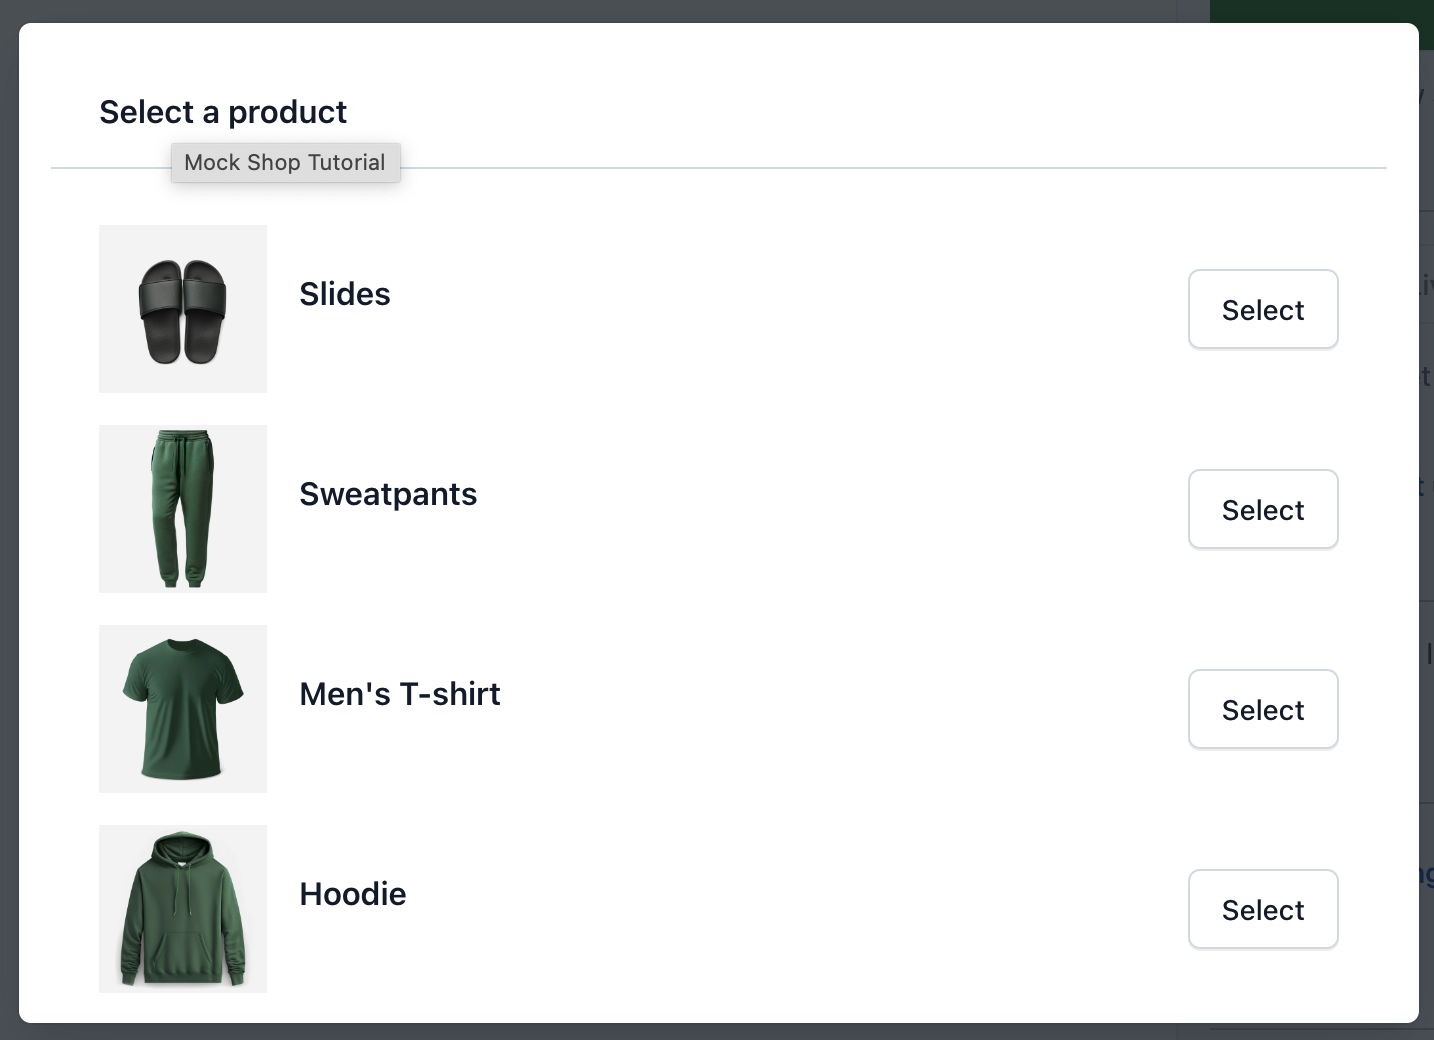
- Choose any product from the list, and click Select to assign it to the entry field.
- Click Publish. When you request the entry, it will contain the mock.shop product ID.
You can query the Contentful GraphQL API with the GraphQL Playground app which can be installed through Contentful's App Marketplace. This provides you with autocompletion and handles authentication. By executing the following query:
query {
  productCollection {
    items {
      productId
    }
  }
}
Or fire the query with curl:
curl -X POST "https://graphql.contentful.com/content/v1/spaces/${SPACE_ID}/environments/master" \
  -H "Content-Type: application/json" \
  -H "Authorization: Bearer ${CONTENT_PREVIEW_API_TOKEN}" \
  -d '{"query": "query { productCollection { items { productId }}}"}'
The response and the schema contains only the mock.shop product ID:
{
  "data": {
    "productCollection": {
      "items": [
        {
          "productId": "gid://shopify/Product/7982904639510"
        }
      ]
    }
  }
}
When inspecting the schema we notice that we can only fetch the productId on the Product type:
query {
  __type(name: "Product") {
    name fields {
      name
    }
  }
}
{
"data": {
"__type": {
"name": "Product",
"fields": [
{
"name": "sys"
},
{
"name": "contentfulMetadata"
},
{
"name": "linkedFrom"
},
{
"name": "productId"
}
]
}
}
}To retrieve the actual product data, we would typically have to make an additional request to the mock.shop API. Rather than fetching this data on the client side or through a dedicated backend for frontends, we can streamline the process by using an Function with Contentful's GraphQL API. With the Function, you can seamlessly integrate the product data directly into the content graph.
Creating and uploading the Function
Our example already contains the necessary code to handle product data resolution in the delivery process. We also got a contentful-app-manifest.json file which contains some configuration for the Function itself.
{
  "appFunctions": [
    {
      "id": "MockShopTutorial",
      "name": "MockShopTutorial",
      "description": "In this tutorial, you will learn how to create an Function that fetches data from a mock shop API.",
      "path": "functions/mockShop.js",
      "entryFile": "functions/mockShop.ts",
      "allowNetworks": ["https://mock.shop/api"]
    }
  ]
}id: The id of the Function.name: A readable name for te Function.description: A brief description of the Function.path: This is the path to the transpiled source file of the Function in your bundle. Exposing ahandlerfunction.entryFile: Path pointing to the source file of the Function. Exposing ahandlerfunction.allowedNetworks: A list of endpoints the Function should be allowed to connect to.
Now, let's examine the code generated in ./functions/mockShop.ts. To start, we'll explore the primary entry point of the Function, which is the handler function:
export const handler: EventHandler = (event, context) => {
  if (event.type === 'graphql.field.mapping') {
    return fieldMappingHandler(event, context);
  }

  if (event.type === 'graphql.query') {
    return queryHandler(event, context);
  }

  throw new Error('Unknown Event');
};
The handler is called for two specific events: graphql.field.mapping and graphql.query. The graphql.field.mapping expects a mapping which describes how your content model is connected to the external API. The graphql.query event will be triggered when data is requested. This event also handles the introspection request to retrieve the schema of the external GraphQL API.
Additionally, context data is passed along, including app installation parameters like the apiEndpoint, which was configured with the app.
For each event we have implemented dedicated functions. Let's start with the fieldMappingHandler:
const fieldMappingHandler: FieldMappingHandler = (event) => {
  const fields = event.fields.map(({ contentTypeId, field }) => ({
    contentTypeId,
    fieldId: field.id,
    graphQLOutputType: 'Product',
    graphQLQueryField: 'product',
    graphQLQueryArguments: { id: '' },
  }));

  return {
    namespace: 'MockShop',
    fields,
  };
};
The event object passed into the fieldMappingHandler contains the following fields:
fields[]: An array of all fields that are configured to be resolved by this FunctioncontentTypeId: The id of the content typefield.id: The id of the field
The field mapping function returns an object describing how the mock.shop API is connected to your content type.
fields: Since you can assign multiple fields per content type to the Function, this is represented as an array.contentTypeId: The ID of the content type you want to resolve data for, which, in our case, is the previously created "Product".fieldId: The ID of the field where the content reference is stored.graphQLOutputType: The GraphQL type that the resolved data belongs to. In this case, we use the "Product" type provided by the mock.shop API. If this not set the type will default to the return type of thegraphQLQueryField.graphQLQueryField: The field of the mock.shop API from which we want to retrieve the product data.graphQLQueryArguments: An object containing all arguments which should be supplied to the query:<key>: The name of the argument<value>: A JSONPointer value to assign a Object property from your field as the argument value (e.g. /id). As we are using a Symbol field we need to use the entire field value which is done by providing an empty string ''.
namespace: This is the prefix that is added to the GraphQL schema to avoid name collision between GraphQL schemas.
Now let's have a look at the queryHandler:
const queryHandler: QueryHandler = async (event, context) => {
  const { apiEndpoint } = context.appInstallationParameters;
  const response = await fetch(apiEndpoint, {
    body: JSON.stringify({
      query: event.query,
      operationName: event.operationName,
      variables: event.variables,
    }),
    method: 'POST',
    headers: { Accept: 'application/json', 'content-type': 'application/json' },
  });

  return response.json();
};
In this function, we essentially proxy the query to the mock.shop API.
First, we extract the apiEndpoint from the context.appInstallationParameters.
Next, we make the actual request to the mock.shop API. All the parameters required to submit the GraphQL request are contained in the event object and passed as a body to the fetch function. This is similar to a regular GraphQL request you would make without a GraphQL library.
Finally, we return the retrieved response, which will be included in the request to Contentful's API.
The event object passed into the queryHandler contains the following fields:
query: This is the sub query related to the data we are queuing on the api.isIntrospectionQuery: Indicates if the query is introspection queryvariables: All variables related to the query
The expected return shape aligns with GraphQL specification
The context contains, for both events, the spaceId and environmentId for the current execution. It also provides the appInstallationParameters. In our example this will contain the apiEndpoint.
Upload the Function
With all the code in place, we can now upload the Function and test it. To upload the code, we need to:
- build the function
- upload it.
The first time you upload the function, the interactive CLI will prompt you to provide a few details, such as a CMA Access Token, the organization where you have just created your app definition, and the app definition itself.
$ npm run build # compiles all the code
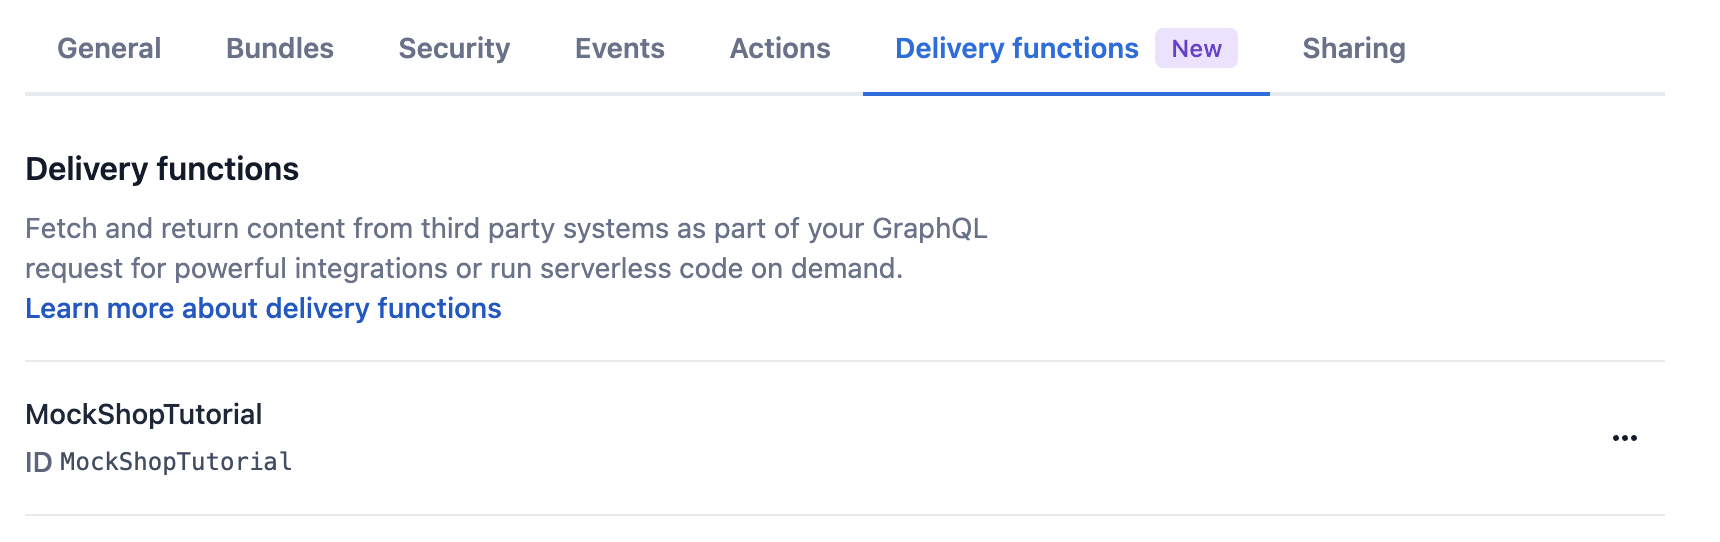
$ npm run upload # uploads all the codeNow, when you check the app details of your tutorial app, you'll see on the "General" tab that your app bundle has been uploaded.
Under the "Functions" tab, you'll also see that the Function has been uploaded.
Enable Resolve content on delivery
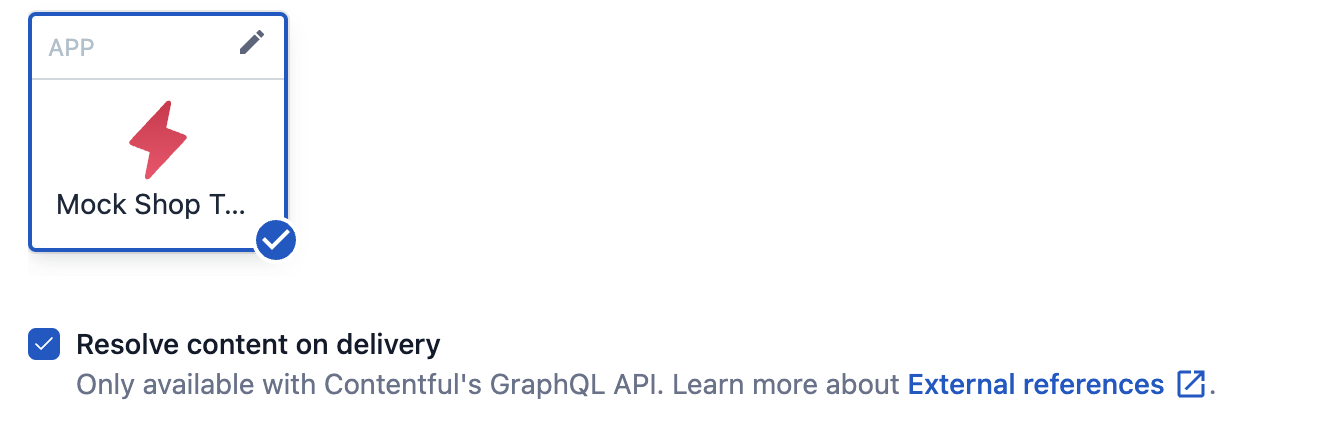
To be able to resolve products through Contenful's GraphQL API in delivery we have to enable this on the ProductId field by selecting the Resolve content on delivery check box.
To enable the check box:
- Navigate to the "Content model" tab and select the Product content type.
- Click Edit on the ProductId field. The field configuration window is displayed.
- In the "Appearance" section, select the Resolve content on delivery check box.
- Click Confirm.
- Save your changes. Now we are able to retrieve product information through a single GraphQL request.
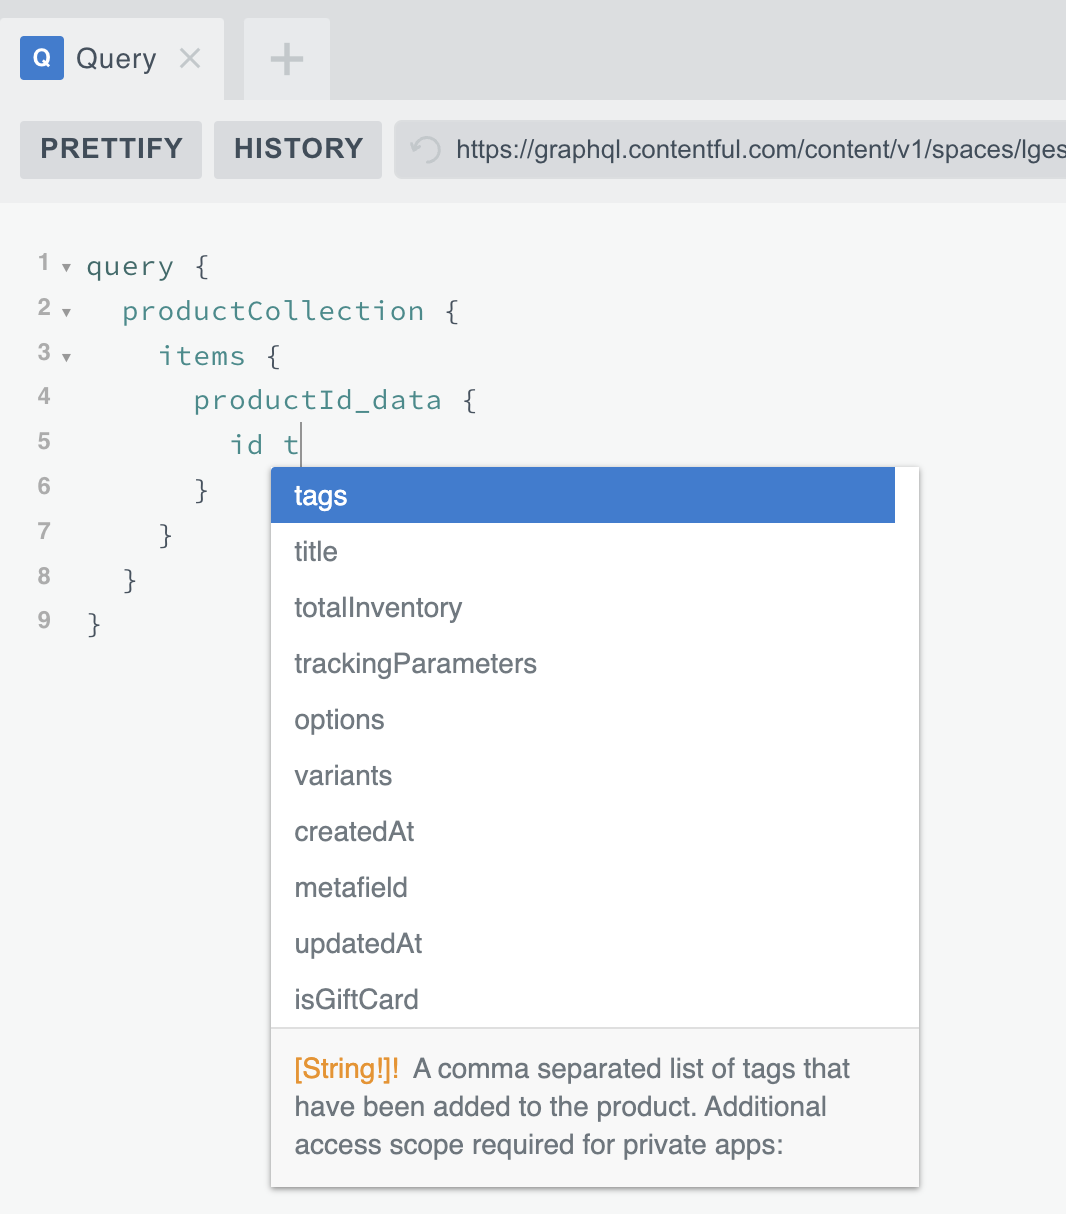
Retrieve product data through Contentful's GraphQL API
With the Resolve content on delivery check box enabled, the field where it's activated will be extended with a new field. This field is named after the one assigned to the Function and has a _data suffix. In our case, it's productId_data.
You can write the following query to request product data through the Contentful GraphQL API:
query {
  productCollection {
    items {
      productId_data {
        id
        title
      }
    }
  }
}
Execute the query to check if you've configured everything correctly. You can again use the GraphQL playground:
Or use curl to query the product data through Contentful's GraphQL API:
curl -X POST 'https://graphql.contentful.com/content/v1/spaces/${SPACE_ID}/environments/master' \
  -H "Content-Type: application/json" \
  -H "Authorization: Bearer ${CONTENT_PREVIEW_API_TOKEN}" \
  -d '{"query": " query { productCollection { items { productId_data { id title }}}}"}'
The response now includes product information retrieved from the mock.shop API:
{
  "data": {
    "productCollection": {
      "items": [
        {
          "productId_data": {
            "id": "gid://shopify/Product/7982904639510",
            "title": "Hoodie"
          }
        }
      ]
    }
  }
}
Conclusion
This tutorial has guided you through the process of seamlessly integrating the mock.shop API into your editorial and delivery workflows using Contentful's Functions and Framework. You've learned how to create a custom app definition, configure Functions, and deploy the necessary code to resolve product data efficiently.
By leveraging Contentful's GraphQL API and a dedicated Function, you can effortlessly retrieve product information directly into your content graph, streamlining the content integration.