Upgrade to customizable Compose content model
Table of contents
- What is the customizable Compose content model?
- Goal of this guide
- Who should upgrade?
- Is upgrading required?
- Recommended resources
- Overview of steps
- Step 1: Prepare for the upgrade
- Step 2: Upgrade to the customizable Compose content model
- Step 3: Update your space settings
- Step 4: Make changes to your website code
- Step 5: Move your changes to production
What is the customizable Compose content model?
The customizable content model of Compose gives you full flexibility to use any content model with Compose and works great with existing spaces that have been developed without adhering to the content model requirements of the legacy Compose content model.
To learn more about the benefits of the customizable Compose content model, refer to Customizable Compose content model.
Goal of this guide
The goal of this guide is to instruct you on how to upgrade from legacy to customizable Compose content model in an environment with existing content, including updating the content model, migrating the content, making changes to your website code and the space settings.
Who should upgrade?
Follow the instructions in this guide if you are using the legacy Compose content model in your environment with existing content and would like to switch to using the customizable Compose content model in that environment.
Is upgrading required?
Compose supports both legacy and customizable content models.
Upgrading to the customizable Compose content model is totally optional. You can continue working with the legacy Compose content model if you prefer.
However, some future improvements for Compose may only be supported by the customizable content model due to technical reasons. Also, installing the legacy Compose content model in a newly added space is not supported.
Recommended resources
For the successful upgrade, we recommend that additionally to this guide you read the following documents:
- Page types and legacy page types — Learn about the underlying content types of pages in Compose with customizable and legacy content models.
- Aggregates — Learn how boundaries of a page are defined.
- CMS as Code — Learn about CMS as code approach and how Contentful helps implement it.
- Contentful CLI — Learn how to work with Contentful CLI.
- Content Management API — Technical reference for content management API.
Overview of steps
Upgrading to customizable Compose content model is accomplished by going through the following major steps:
Step 1. Prepare for the upgrade — Create a dedicated environment for the upgrade and a backup copy of your content.
Step 2. Upgrade to the customizable Compose content model — Make changes to your content model and migrate the content.
Step 3. Update your space settings — Ensure your space settings are aligned with changes to the content model.
Step 4. Make changes to your website code — Update the code of your website to make API calls to load and render web pages based on the new customizable Compose content model.
Step 5. Move your changes to production — Apply the new content model to the production environment and deploy the updated code.
Step 1: Prepare for the upgrade
Create dedicated environment
We strongly recommend you to perform the Compose upgrading in a dedicated environment to ensure that your production content is not affected while you iterate on the migration and work towards the upgrade.
To set up a dedicated environment, clone the environment in which you use the legacy Compose content model.
Back up your content
Create a backup copy of your content to ensure you don’t lose anything during the upgrade.
We recommend doing the following kinds of backup:
Set up a backup environment — Create a backup environment (for example, “backup-master-compose-upgrade”) and clone your existing “master” environment into it. Don’t make any changes to the backup environment.
Export your content using our export tool — Save a copy of your current “master” environment on your local machine by exporting your content with Contentful CLI.
Step 2: Upgrade to the customizable Compose content model
Legacy vs Customizable Compose content model
The goal of the upgrade is to transform your legacy Compose content model into the customizable Compose content model.
The table below displays the structures of legacy and customizable Compose content models and explains the difference between them. The image and comments under the “Legacy Compose content model” refer to the Compose content model before the upgrade, and the image and comments under the “Customizable Compose content model” describe the content model you receive as a result of the upgrade.
| Legacy Compose content model | Customizable Compose content model |
|---|---|
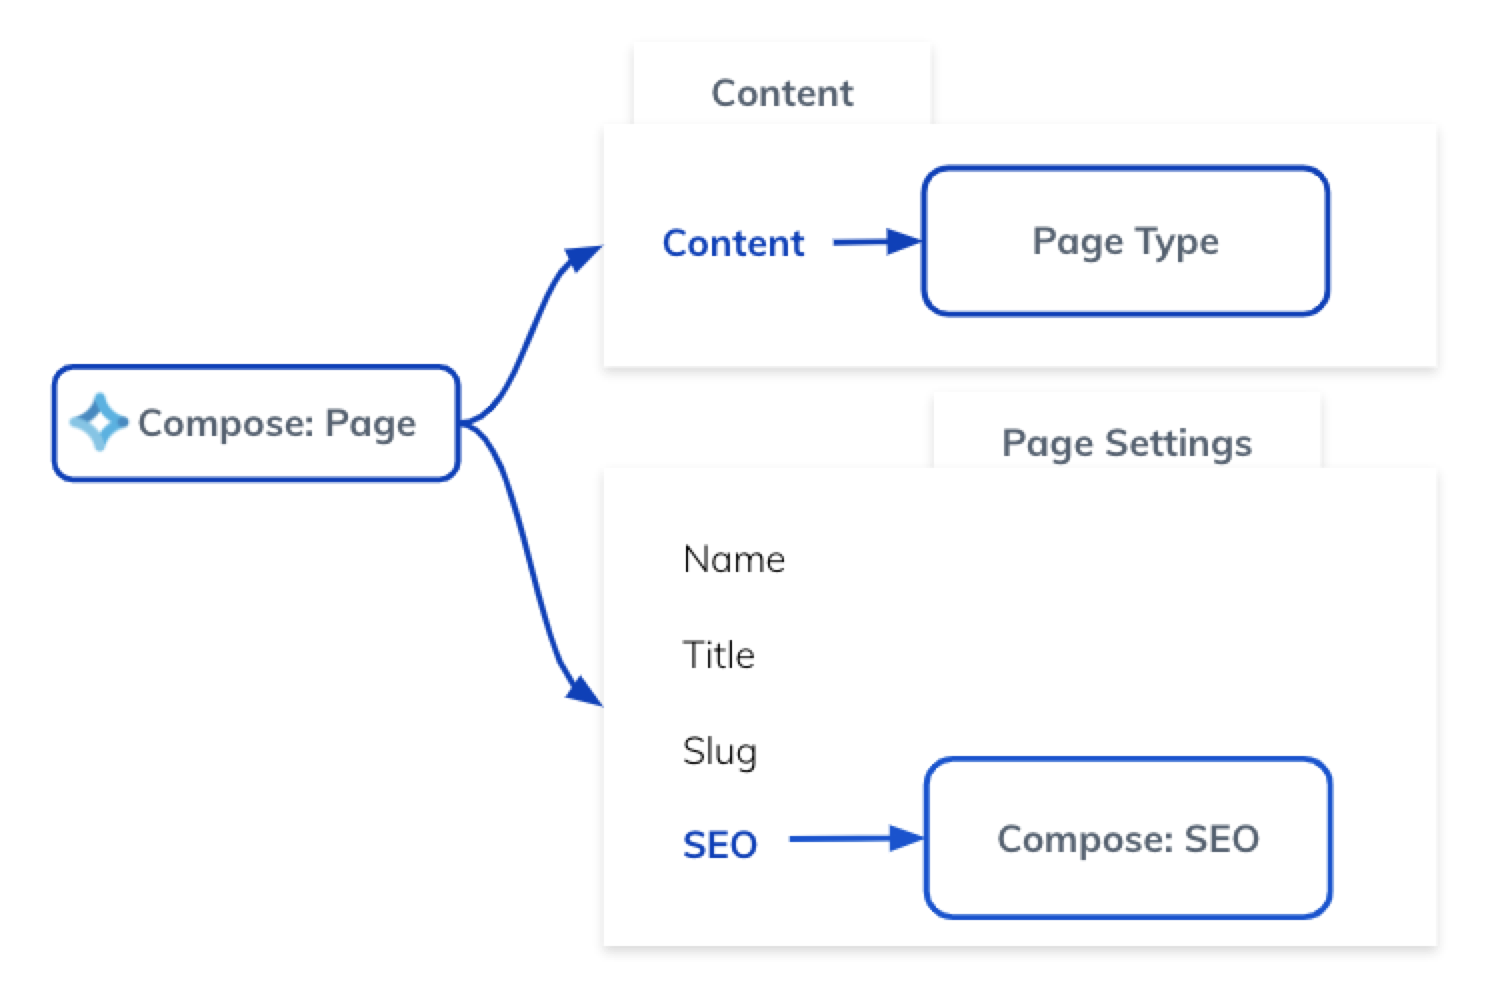 |
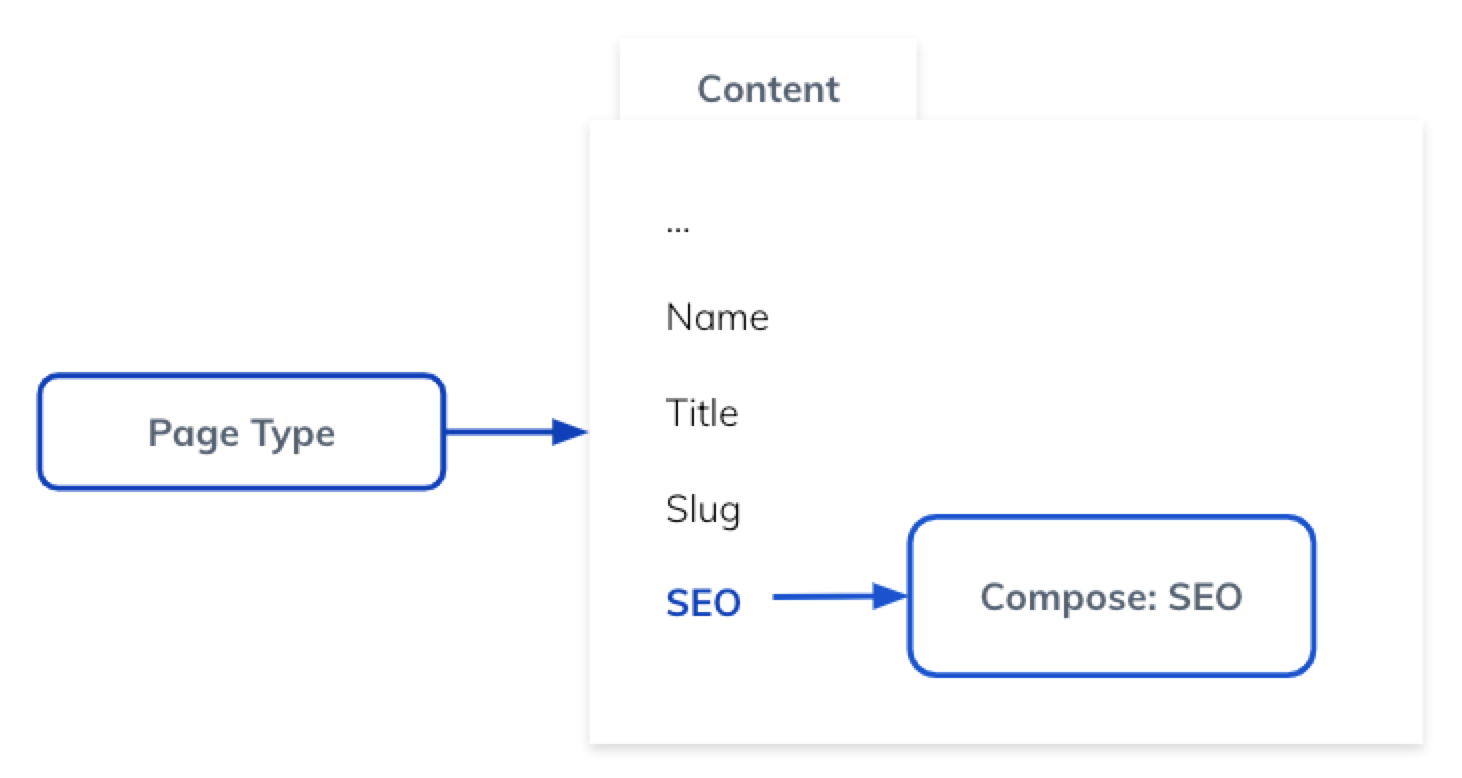 |
|
|
Rebuild your content model
To rebuild your legacy Compose content model, perform the following steps:
Update the page types
To update a page type:
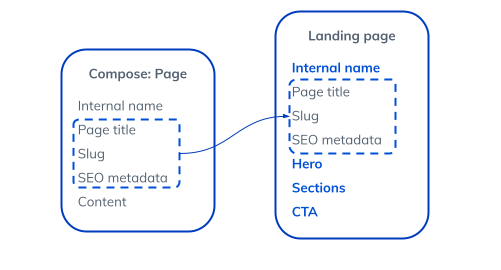
- Duplicate the fields from the “Compose: Page” content type to the page type content type:
Update each content type that you currently use in Compose as a page type by adding all the fields from “Compose: Page” to it.

- Add the “Aggregate Root” annotation to the page type:
For Compose to recognize your page types, assign the “Aggregate Root” annotation to each content type that represents a page type in your content model.
- Activate the page type:
Activate your content type via the corresponding API calls.
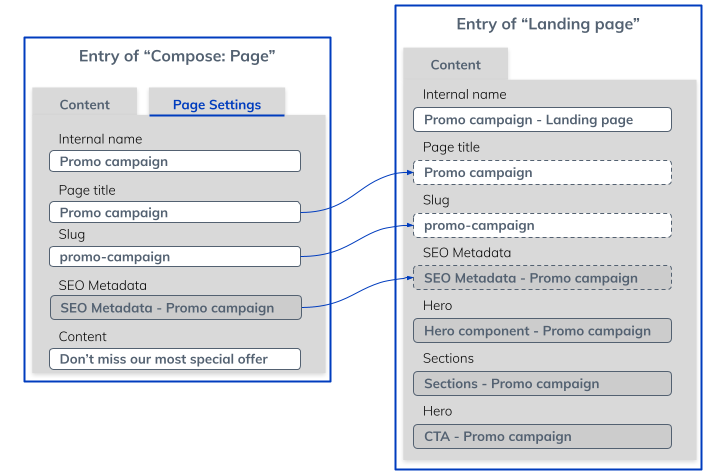
- Copy content from “Compose: Page” into duplicated fields of the page type:
Go through all entries of “Compose: Page” and move the values from the fields you duplicated in step one to the respective page type entry. In our example, the values from the “Page title”, “Slug” and “SEO Metadata” fields are copied from the parent “Compose: Page” entry to the target “Landing page” entry.
Update the content types
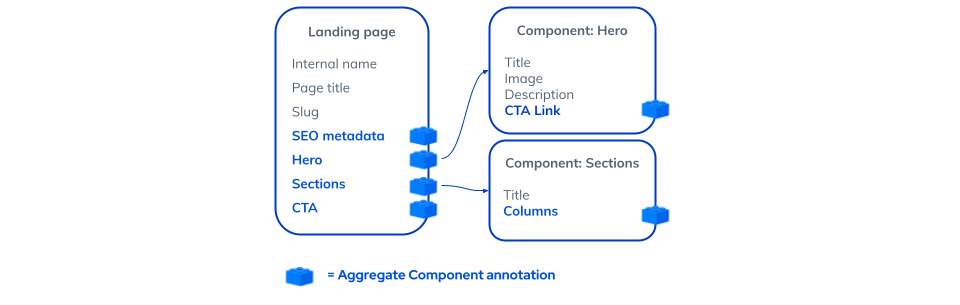
- Replace “Composition relationship” setting with an “Aggregate Component” annotation:
Check all your reference fields to find the ones that have the “Composition relationship” setting enabled and assign an “Aggregate Component” annotation to them.
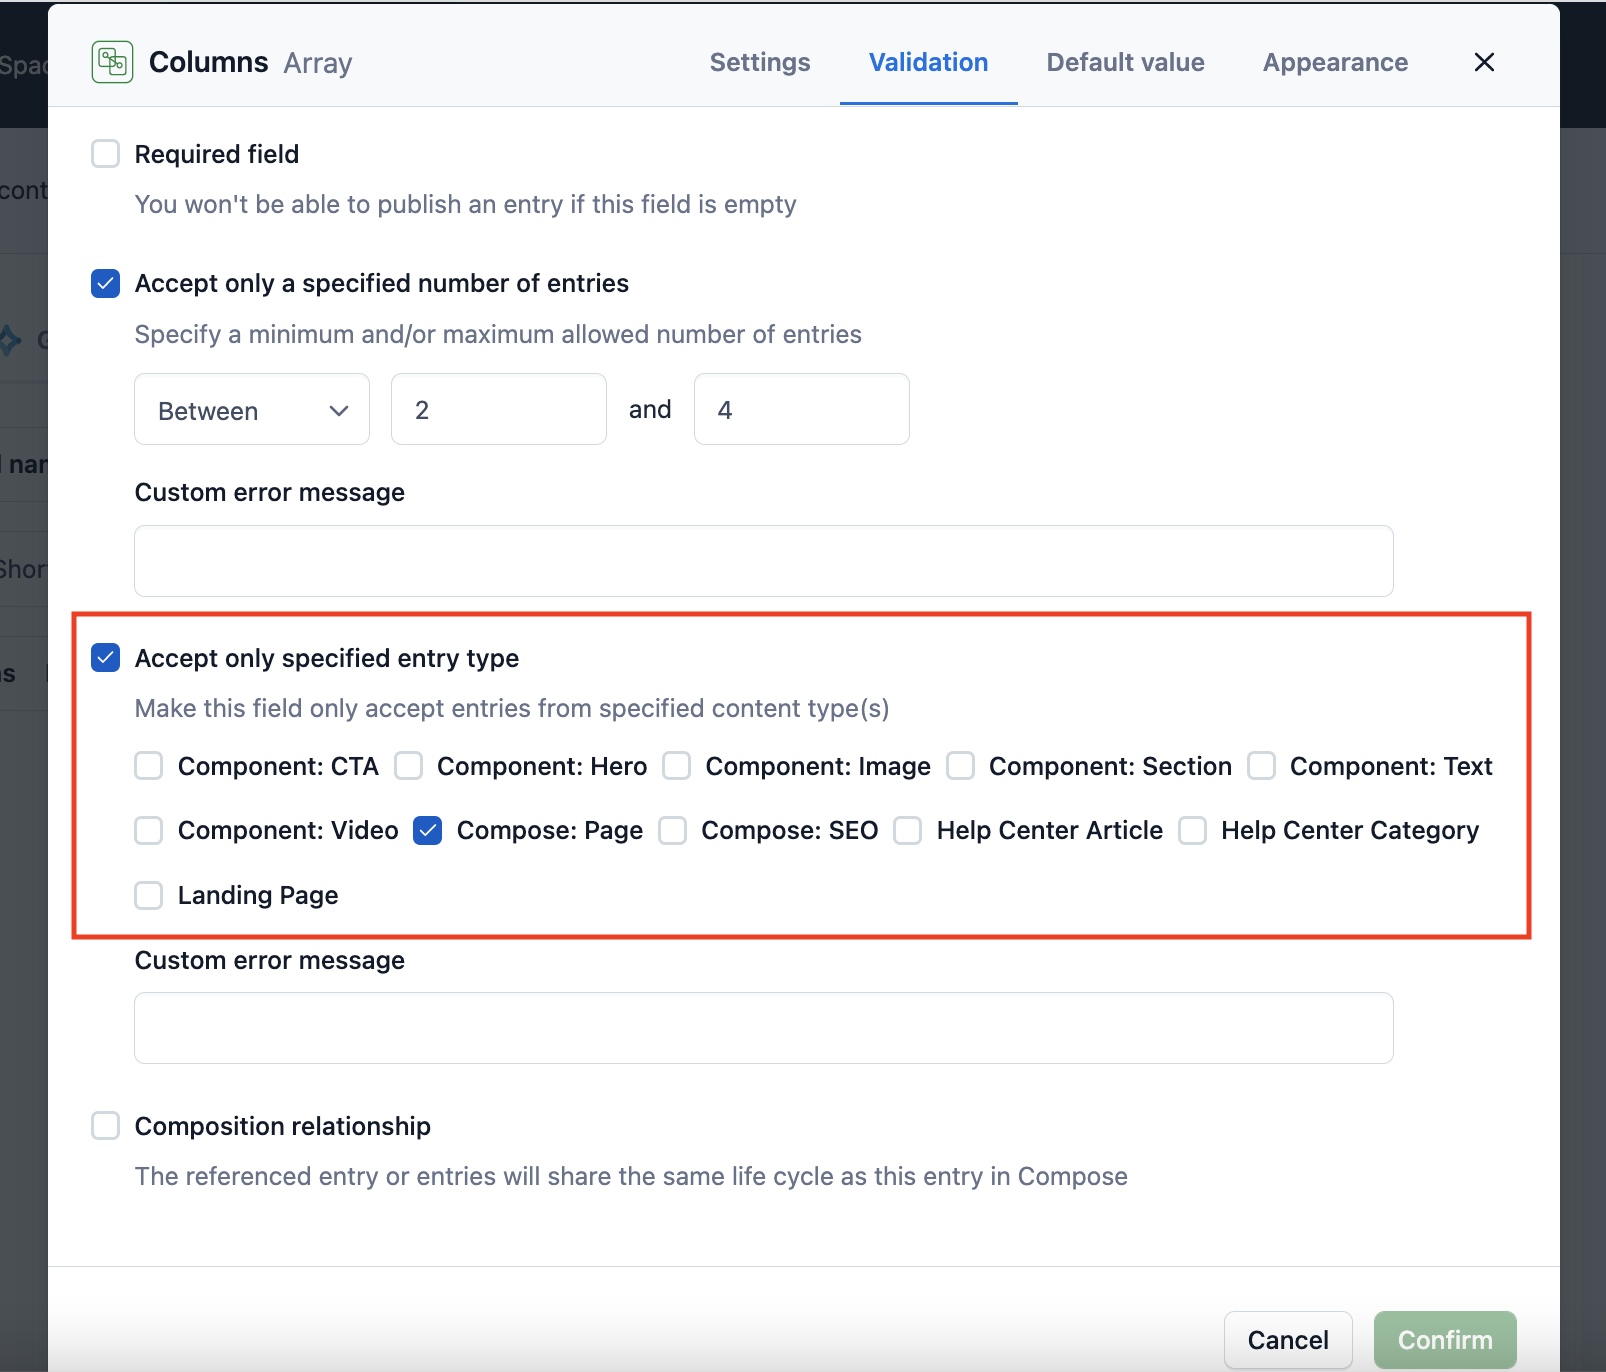
- Replace validations that restrict linking to “Compose: Page”:
Check the validations for single reference, multi reference and Rich Text fields. If any of those fields is restricted to link to the “Compose: Page” content type, replace that validation to allow entries to link to every page type (e.g. “Landing page” and “Help center article”) instead.
- Update and activate the content type:
Update and activate your content type via the corresponding API calls.
Update the entries
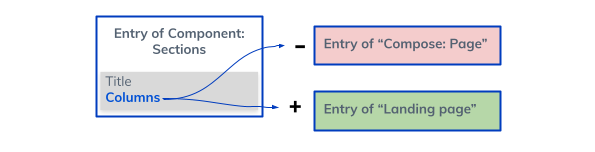
- Update references linking to a “Compose: Page” entry:
In the entries, replace references to the entries “Compose: Page” with the references to the relevant page types.
- Publish entry:
After going through all the fields of an entry that need to be updated, publish the entry to apply the changes.
Test the migrated content in Compose
After rebuilding your content model to support customizable Compose and completing the content migration, you can view and manage pages within Compose.
Before moving to the next steps of updating the space settings and adjusting your website code, manually verify if the content migration was successful by reviewing your pages in Compose against the checklist below:
- Are all pages visible in Compose?
- Are all page types available in Compose?
- Does each page type have the right amount of pages?
- Are the page and SEO settings correctly migrated and contain the expected values?
- Is the content of the pages correct and complete?
- Are references and links between entries and assets correct?
- Have all content type customizations been migrated?
- In the reference fields, have all “Composition relationship” settings been replaced with “Aggregate Component” annotations?
- In the reference fields, have all links to “Compose: Page” been replaced with links to relevant page types?
In case you detect any errors, you can either manually correct them or adjust your migration scripts and re-run the migration in a new environment.
Delete “Compose: Page” content type and its entries
- Delete “Compose: Page” entries:
After updating the entries as described in Update the entries, delete the entries of “Compose: Page”.
- Delete “Compose: Page” content type:
Delete the “Compose: Page” content type from your environment.
Optional: Create tabs for a page type
After the process of rebuilding your content model is finished, the fields in your page types will be displayed under a single “Content” tab in the Compose page editor. To add more tabs and move your fields between them, group your fields as described in Set up field groups.
Step 3: Update your space settings
Revise the space settings that are affected by the content model changes as follows:
- Revisit your webhooks — Make sure your automations are configured to listen to events for page types instead of the legacy “Compose: Page” content type. It may affect any automations or integrations (e.g., your build process, search indexing) if you don’t.
- Edit custom roles — Update your existing custom roles that were set up for the legacy Compose content model to work with the customizable Compose content model following the instructions in Roles and Permissions for Compose.
- Reconfigure the website previews for each page type to enable the editors to preview content changes within Compose.
Step 4: Make changes to your website code
Update your API request code
After your Compose content model is upgraded, it is necessary to update code in your frontend applications to load and render Compose pages.
In your code, you most likely have functionality to resolve URLs using slug fields on your legacy page types which triggers API calls to Contentful to load the requested page data. In this stage, you need to adjust the existing API calls to the top-level “Compose: Page” content type to query the newly migrated Compose page types instead.
Let’s consider an example where a page of a page type called “Landing page” is queried. With legacy Compose content model, a query to the REST API looks as follows:
client.getEntries({
  limit: 1,
  include: 10,
  'fields.slug': ‘my-homepage-slug’, // the slug of the requested page
  content_type: ‘page’, // query on “Compose: Page” content type
  'fields.content.sys.contentType.sys.id': ‘landing_page’, // the page type of the referenced page needs to be a “Landing page”
})
With customizable Compose content model, a call to the REST API looks as follows:
client.getEntries({
  limit: 1,
  include: 10,
  'fields.slug': ‘my-homepage-slug’, // the slug of the requested page
  page_type: ‘landing_page’, // query on “Landing page” page type
})
As you can see, the additional layer for the “Compose: Page” content type is gone and you can query directly the page type you are looking for.
Once the pages load and render, adjust the rendering of page and SEO metadata.
Test the code changes on a staging server
After making changes to the website code, verify that your website works as expected according to the following criteria:
- Are all pages available and rendering correctly?
- Do links between pages still work?
Step 5: Move your changes to production
After testing the content model and website code changes, move your changes to the production environment.
Apply content migration to production environment
Apply the content model updates and the content migration from the dedicated environment that you created for upgrading to the customizable Compose content model to your production environment. We recommend applying your content migration to the production environment according to one of the following ways:
Use environment aliases to switch to your production environment.
Apply all migration scripts to your production environment.
Deploy the updated version of the website
After the content model updates and content migration are applied to your production environment, deploy your website code changes to your production server.
Once deployed, do a last round of testing to check if your website works as expected.
